M E D I C I
  • HOME
  • REATEC
    • GENERAL & TECHNICAL INFO
  • REATEC GALLERY
  • GLASS FILM
  • WALLCOVERINGS
    • XSELECT
    • RéSERVE
    • FAITH
    • Roysons
    • AdaWall
    • Barbarossa
    • Studioart
  • CONCRETE FLEX
  • CORK PINBOARDS
  • CORK WALLS
    • PRIMECORK CLASSIC
    • PRIMECORK PREMIUM
    • 3D CORK BRICKS
    • BEV. CORK BRICKS
    • RUSTICORK
    • SENSES
    • DROP
    • BEEHIVE
    • MORE CORK WALLS
  • CORK FLOORS
  • CORK LEATHER
  • CORK GALLERY
  • ACOUSTIC SOLUTIONS
    • Acoustic Wallpaper
    • PET ACOUSTIC FELT fabric 3mm
    • PET ACOUSTIC PANELS 9 / 12mm
    • PET ACOUSTIC PANELS | CARVED
    • PET ACOUSTIC | CEILING
    • PET ACOUSTIC | SCREEN
    • PET WALL PANELS | INSTALLATION GUIDE
    • MLV FLEXIBLE NOISE BARRIER
    • CORK PANELS
  • FABRICS | CURTAINS
    • VOILE | SHEER | ANTI-POLLUTION
    • SALT | LINEN LOOK
    • LINEN | DIMOUT
    • SENSE | ACOUSTIC
    • AKEMI | ACOUSTIC
    • TWIN | DIMOUT | ACOUSTIC
    • HANDWOVEN RAW SILKS
    • FOREST EMB NATURAL
    • FOREST EMB DUPION
    • COTTON PRINTS (MULTI PURPOSE)
    • LINEN PRINTS (MULTI PURPOSE)
  • FABRICS | UPHOLSTERY
    • TRENDS | THE ESSENTIALS FOR ALL INTERIORS
    • VELVET (PLAIN & QUILTED)
    • TIBET (SHEEPSKIN-LOOK)
    • MOCKA (SUEDE FEEL & LOOK)
    • VALENTIA (PURE LINEN)
    • HIGH PERFORMANCE
  • FABRICS | OUTDOOR
    • PORTO WR | SARDINIA
    • VELVET | OUTDOOR
    • HEMP
    • MIAMI | ORLANDO | DONAU | BORA | CORSICA
    • MYKONOS
    • FORTEZZA
    • VENICE | SEINE | LOT | LOIRE | LIMA
  • FABRICS | LUXURY
  • VINYLS
    • NAPPA | SUPER SKIN
    • WAXY | SUPER SKIN
    • VINTAGE | SUPER SKIN
    • ORIGINAL | HEALTH CARE
    • PRO | ink/denim stain resistant
    • BRISA | ACOUSTIC - BREATHABLE
  • LEATHERS
    • CITY | 84 COLOURS
    • PERFORMA | OUTDOOR
  • SPECIAL IMPORTS
  • CONTACT US
  • MARKETING DOWNLOADS
    • PROCUREMENT
    • CURTAIN FABRICS FOR ABSORBING SOUND
    • UPHOLSTERY FABRICS FOR ABSORBING SOUND
    • TRANSPARENT AND OPAQUE FABRICS FOR ABSORBING SOUND
    • ACOUSTIC BREATHABLE FABRICS
    • VICSTRIP ACOUSTIC PANELS
    • SOFALCA AND GENCORK WALL DESIGN
    • AGUA PERFORMANCE UPHOLSTERY FABRICS
    • REATEC - MEDICI
    • REATEC - ARCHITECTURAL DECORATIVE FILM
    • REATEC - CONCRETE/METAL/STUCCO/RUST/MARBLE/STONE
    • REATEC - HOSPITALS AND HEALTH CARE
    • REATEC KITCHENS | BATHROOMS | SPA'S
    • REATEC FURNITURE
    • REATEC - MARINE
    • REATEC - FOR DOORS, LIFTS, LIFT LOBBIES, CUPBOARD DOORS
    • DECORATIVE WOOD FILM
    • ACOUSTIC SOLUTIONS
    • ACOUSTIC AND DECORATIVE PET. FELT
    • FRAMEWORK ACOUSTIC CEILING PANELS
    • ACOUSTIC WALLPAPER
    • ACOUSTIC WOODEN SLAT PANELS
    • ACOUSTIC CORK SOLUTIONS
    • ACOUSTIC FOAM PANELS
    • MEDICIPET CUSTOMIZED V CUT ACOUSTIC PANELS
    • WOOD PLASTIC COMPOSITE WALL + CEILING PANELS
    • FOREST EMBROIDERED DUPION SILK
    • THE EARTH COLLECTION
    • CASADENZA LIGHTWEIGHT STONE VENEERS
    • WALLPAPERS & WALLCOVERINGS
    • DESIGNER FABRICS
    • YO2 DESIGNER WALLPAPERS AND RUGS
    • GLASS FILM
    • IMPORT ASSISTANCE
  • THE EARTH COLLECTION CATALOG
    • THE EARTH COLLECTION PANELS
    • THE EARTH COLLECTION - PRINT
    • THE EARTH COLLECTION - ACOUSTIC
    • THE EARTH COLLECTION PROJECTS
  • SEA SILK HAIR + SKIN CARE
    • SEA SILK PREMIUM : CLEANSING and CONDITIONING TREATMENT
    • EMERALD - sea mineral therapy shampoo
    • EASTERN GARDEN - sea silk hair conditioner
    • OCEAN - therapy sea mineral leave-in-hair-treatment
    • SHIRAKAMI - sea silk face cleansing powder to foam
    • YUCATÀN - sea silk Biom vita exfoliating toning essenz
    • ZANZIBAR - sea silk hydration serum
    • DUNES - SEA SILK FACE CREAM
Picture

​Wall Preparation

Before beginning the installation process, ensure that the surface is clean (free of any dust, flaking paint, loose debris or grime), structurally sound, dry and free of imperfections.

Wear gloves at all times throughout the installation process. When cutting and fitting panels to fit the space, consider which areas of the surface will contain the cut portions and try to apply the products as symmetrically as possible. It may help to measure and mark the space beforehand.

Printed Panels
Ensure that all Printed Panels are installed at the correct orientation. This is to avoid any variation in pattern that may impact the overall look of the finished installation.

Adhesive Method
Tools & materials required:
  • Clean gloves
  • Utility knife
  • Straight edge
  • Measuring tape
  • Ladder/scaffolding
  • Caulking gun
  • J-Roller
  • Construction adhesive
  • Spray adhesive
    Preparation
  1. Wear clean white gloves throughout the installation process. Use matching caulk to fill in any unwanted cracks in joints or between panels and ceilings.
  2. After preparing the surface for installation, dry fit (without adhesive) the panels. Measure the panels against the surface and ensure they are straight and line up. If required, use the utility knife and the straight edge to accurately cut the panels to the appropriate dimensions.
  3. Trim off an excess material around joins, pipes, vents or lighting.
Applying construction adhesive
• Using the caulking gun and construction adhesive, apply the adhesive around the inner edge of the ceiling panel. To avoid adhesive flowing through
the joins when the panels are installed, apply the adhesive two finger widths away from the corner/ join, then apply adhesive in a zig zag pattern across the centre of the panel, (as shown in fig. a).
Picture

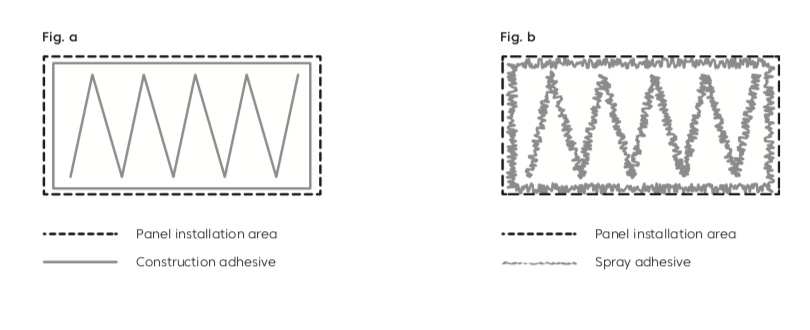
Applying spray adhesive

Apply the spray adhesive around the inner edge of the panel, 50-100mm widths away from the panel perimeter (as shown in fg. b). Wait 5-10 minutes for the adhesive to be become tacky before installing the panels.

Installation
  1. Keeping the panel as straight as possible, press the underside of the panel onto the surface. Apply pressure to panels when mounting to ensure the seams are tight, otherwise we recommend leaving a reveal between panels.
  2. Apply even pressure with the roller and firmly press all areas of the panel to the surface. If required, hold the panels in place for a few minutes using poles or scaffolding.
  3. Wipe away any leaked or excess adhesive from the panel before beginning the adjoining panel. Avoid any adhesive making contact with face of the panel.
  4. Trim off any excess material around joins, pipes, sockets etc.

Picture
Disk Magnet Method
Tools required:
  • Clean gloves
  • Utility knife
  • Straight edge
  • Measuring tape
  • Adhesive 
  • MDF spacers with magnet (application surface)
  • Metal mounting plates (acoustic panel)

Steps
  1. Attached metal mounting plates on acoustic panel, then measure the placement of the metal plates on the panel, and mark out the corresponding location on the application surface (wall / ceiling).
  2. Using the adhesive, place a 3mm zigzag bead over the back side of the MDF spacer with magnet piece. Press onto application surface at the marked location.
Leave the spacer in place on the application surface for approximately 12 hours before installing the acoustic panels. (longer curing time may be required in cold weather conditions)

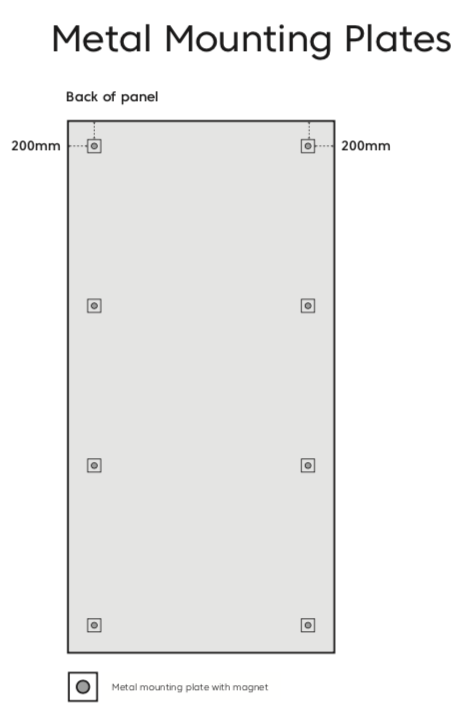
3. Match plates to the magnets when installing panels to the application surface. These should click into place if measured out correctly.


Pot Magnet Method
Tools Required
  • Clean gloves
  • Straight edge
  • Measuring tape
  • Ladder .
  • Adhesive
    (we recommend SOUDAL Fix All High Tack)
  • Screws 6g x 15 – 20mm (depending on thickness of panel)
  • Accessories 
  • 8 metal plates attached to panel
  • 5 metal plates 1.6mm for wall installation (top 5 positions)
  • 3 L metal plates 0.75mm for wall installation (bottom 3 positions)
  • 8 pop magnets
  • Pop Magnet Method Steps
  1. Prepare the wall surface for installation, use matching caulk to fill in any unwanted cracks in joints.
  2. Wear clean white gloves throughout the installation process.
  3. Attached metal mounting plates with a hole in the centre to screw the pot magnet too, attached to the back of the panel.
  4.  Attaching Metal Plates to Wall (see adjacent image)
  5. Measure the placement of metal plates on the panel and mark out the corresponding location on the wall surface.
  6. The metal plates need to cure for approx. 12 hours before installing the acoustic panel. A longer curing time may be required in colder conditions.
    Screw the pot magnet into the metal plates attached to the panel and line up the plates on the wall. Ensure that the bottom L metal plate captures the pot magnet. This will ensure that the panel doesn’t slip down during installation.
  7. Starting with the top plate, use adhesive, place
    a 3mm zigzag bead over one side of the metal plate and press onto wall at the marked location to match the panel mount location.

  8. Apply the same adhesive to the L metal plate and fix onto the lower position of the wall. Ensure that the L metal mounts are aligned horizontally to maintain the correct vertical alignment of the panel.
Picture

Picture
Z-Clip Method
Tools & materials required:
  • Clean gloves
  • Measuring tape
  • Level bar
  • Z-clip
  • Screws
  • Drill
  • Adhesive

Steps
  1. Determine the location and layout of where the panel(s) will be mounted to the wall (fig. a). Ensure brackets line up with the z-clips and use construction adhesive to adhere the z-clips both to the wall and behind the panels (fig. b).
  2. Mirror mounting locations from panels onto the wall to line up with the z-clips on the back of the panels (fig.c).

Z-Clip Method (continued)
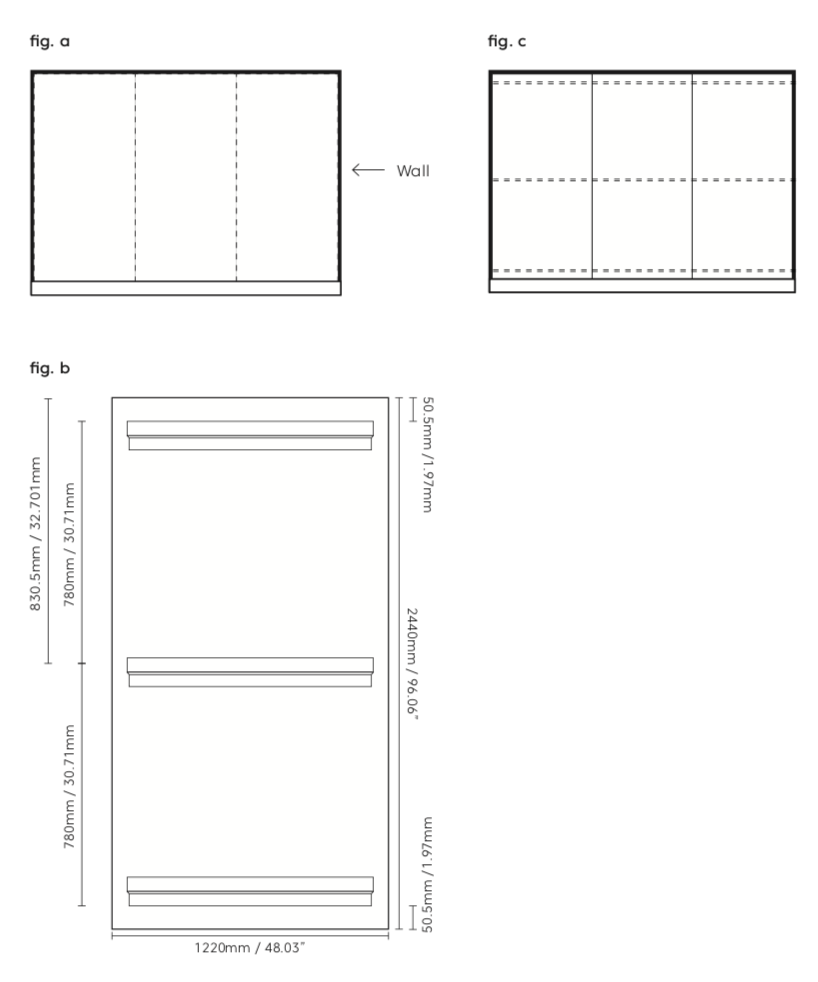
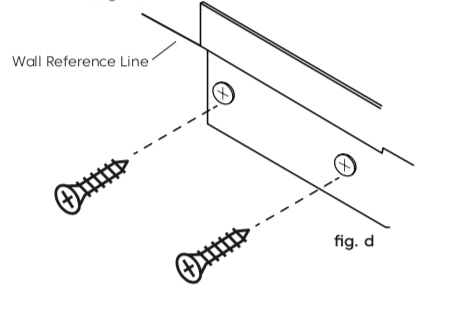
1. Secure the z-clips to the wall with appropriate screws (fig. d).

2. Slide panel z-clip onto the wall z-clip. Ensure panels will mount plumb and level. Repeat these steps for multiple panels (fig. d). Please ensure the panels are well butted together at joints to allow for pattern matching.
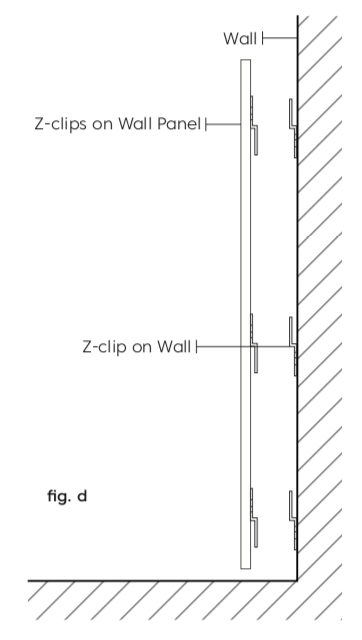
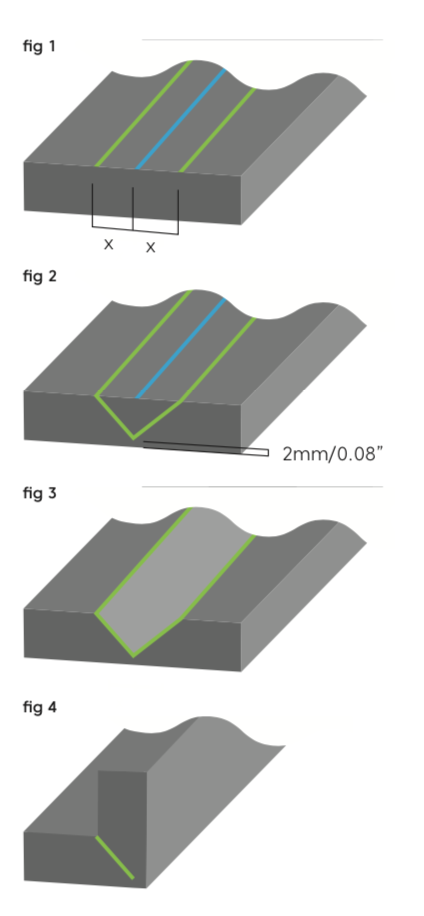
Picture
Picture

Corners & Bends
Tools & materials required:
  • Utility knife/cutting tool
  • Measuring tape/ruler
    Steps:
  1. Measure the corner of the wall/column and ensure the panels will fit seamlessly. Consider the extra panel surface area needed when bending around a corner.
  2. Identify and mark the centre line for the groove
    on the back of the panel to align with the corner edge of wall/column. Measure parallel lines
    equal distance on either side of this centre line to indicate where to cut the v-shaped groove (see figure 1). The appropriate size of the groove varies depending on the panel thickness. For

    12mm acoustic panels, a total width of 2cm. (1cm either side of centre) is suitable.
  3. On the edge of the panel, mark the ‘v’, with the tip 2mm/0.08” from the front surface of the panel (see figure 2).
  4. Use a utility knife or a cutting tool to gently cut the v-groove and remove material (see figure 3). Gradually expand the ‘v’ if required.
  5. Bend panel and fix to wall with desired mounting method (see figure 4).
Picture

Picture
Inside Corners
Tools & materials required:
  • Stanley knife/cutting tool
  • Measuring tape/straight edge
    Steps - Printed Panels (see fig. a):
  1. Account for the 12mm panel thickness gap on each wall.
  2. Cut the material using a straight edge and stanley knife.
  3. Make sure to work from the corner outwards so the design butts perfectly.


    Steps - Plain Panels (see fig. b):
    1. Account for the 12mm panel thickness gap on each wall.
    2. Cut the material using a straight edge and stanley knife.
    3. Make sure to work from the corner outwards so the panels fit perfectly.

DIRECT SHIPMENTS FROM OUR MILLS DOOR TO DOOR ANYWHERE IN THE WORLD

SHOWROOM & HEAD-OFFICE (By appointment only)
Mobile: +27 (0)83 263 2774 (Joseph Davis - CEO) Mobile: +27 (0)83 387 1200 (Dirk Archer-Medici - Artistic Director)
email: [email protected] \ [email protected]  email: [email protected]
  • HOME
  • REATEC
    • GENERAL & TECHNICAL INFO
  • REATEC GALLERY
  • GLASS FILM
  • WALLCOVERINGS
    • XSELECT
    • RéSERVE
    • FAITH
    • Roysons
    • AdaWall
    • Barbarossa
    • Studioart
  • CONCRETE FLEX
  • CORK PINBOARDS
  • CORK WALLS
    • PRIMECORK CLASSIC
    • PRIMECORK PREMIUM
    • 3D CORK BRICKS
    • BEV. CORK BRICKS
    • RUSTICORK
    • SENSES
    • DROP
    • BEEHIVE
    • MORE CORK WALLS
  • CORK FLOORS
  • CORK LEATHER
  • CORK GALLERY
  • ACOUSTIC SOLUTIONS
    • Acoustic Wallpaper
    • PET ACOUSTIC FELT fabric 3mm
    • PET ACOUSTIC PANELS 9 / 12mm
    • PET ACOUSTIC PANELS | CARVED
    • PET ACOUSTIC | CEILING
    • PET ACOUSTIC | SCREEN
    • PET WALL PANELS | INSTALLATION GUIDE
    • MLV FLEXIBLE NOISE BARRIER
    • CORK PANELS
  • FABRICS | CURTAINS
    • VOILE | SHEER | ANTI-POLLUTION
    • SALT | LINEN LOOK
    • LINEN | DIMOUT
    • SENSE | ACOUSTIC
    • AKEMI | ACOUSTIC
    • TWIN | DIMOUT | ACOUSTIC
    • HANDWOVEN RAW SILKS
    • FOREST EMB NATURAL
    • FOREST EMB DUPION
    • COTTON PRINTS (MULTI PURPOSE)
    • LINEN PRINTS (MULTI PURPOSE)
  • FABRICS | UPHOLSTERY
    • TRENDS | THE ESSENTIALS FOR ALL INTERIORS
    • VELVET (PLAIN & QUILTED)
    • TIBET (SHEEPSKIN-LOOK)
    • MOCKA (SUEDE FEEL & LOOK)
    • VALENTIA (PURE LINEN)
    • HIGH PERFORMANCE
  • FABRICS | OUTDOOR
    • PORTO WR | SARDINIA
    • VELVET | OUTDOOR
    • HEMP
    • MIAMI | ORLANDO | DONAU | BORA | CORSICA
    • MYKONOS
    • FORTEZZA
    • VENICE | SEINE | LOT | LOIRE | LIMA
  • FABRICS | LUXURY
  • VINYLS
    • NAPPA | SUPER SKIN
    • WAXY | SUPER SKIN
    • VINTAGE | SUPER SKIN
    • ORIGINAL | HEALTH CARE
    • PRO | ink/denim stain resistant
    • BRISA | ACOUSTIC - BREATHABLE
  • LEATHERS
    • CITY | 84 COLOURS
    • PERFORMA | OUTDOOR
  • SPECIAL IMPORTS
  • CONTACT US
  • MARKETING DOWNLOADS
    • PROCUREMENT
    • CURTAIN FABRICS FOR ABSORBING SOUND
    • UPHOLSTERY FABRICS FOR ABSORBING SOUND
    • TRANSPARENT AND OPAQUE FABRICS FOR ABSORBING SOUND
    • ACOUSTIC BREATHABLE FABRICS
    • VICSTRIP ACOUSTIC PANELS
    • SOFALCA AND GENCORK WALL DESIGN
    • AGUA PERFORMANCE UPHOLSTERY FABRICS
    • REATEC - MEDICI
    • REATEC - ARCHITECTURAL DECORATIVE FILM
    • REATEC - CONCRETE/METAL/STUCCO/RUST/MARBLE/STONE
    • REATEC - HOSPITALS AND HEALTH CARE
    • REATEC KITCHENS | BATHROOMS | SPA'S
    • REATEC FURNITURE
    • REATEC - MARINE
    • REATEC - FOR DOORS, LIFTS, LIFT LOBBIES, CUPBOARD DOORS
    • DECORATIVE WOOD FILM
    • ACOUSTIC SOLUTIONS
    • ACOUSTIC AND DECORATIVE PET. FELT
    • FRAMEWORK ACOUSTIC CEILING PANELS
    • ACOUSTIC WALLPAPER
    • ACOUSTIC WOODEN SLAT PANELS
    • ACOUSTIC CORK SOLUTIONS
    • ACOUSTIC FOAM PANELS
    • MEDICIPET CUSTOMIZED V CUT ACOUSTIC PANELS
    • WOOD PLASTIC COMPOSITE WALL + CEILING PANELS
    • FOREST EMBROIDERED DUPION SILK
    • THE EARTH COLLECTION
    • CASADENZA LIGHTWEIGHT STONE VENEERS
    • WALLPAPERS & WALLCOVERINGS
    • DESIGNER FABRICS
    • YO2 DESIGNER WALLPAPERS AND RUGS
    • GLASS FILM
    • IMPORT ASSISTANCE
  • THE EARTH COLLECTION CATALOG
    • THE EARTH COLLECTION PANELS
    • THE EARTH COLLECTION - PRINT
    • THE EARTH COLLECTION - ACOUSTIC
    • THE EARTH COLLECTION PROJECTS
  • SEA SILK HAIR + SKIN CARE
    • SEA SILK PREMIUM : CLEANSING and CONDITIONING TREATMENT
    • EMERALD - sea mineral therapy shampoo
    • EASTERN GARDEN - sea silk hair conditioner
    • OCEAN - therapy sea mineral leave-in-hair-treatment
    • SHIRAKAMI - sea silk face cleansing powder to foam
    • YUCATÀN - sea silk Biom vita exfoliating toning essenz
    • ZANZIBAR - sea silk hydration serum
    • DUNES - SEA SILK FACE CREAM